


Building your own photo studio doesn’t have to break the bank. In fact, with a bit of creativity and resourcefulness, you can create a stunning DIY photo studio on a shoestring budget. From crafting your own backdrops to finding affordable lighting solutions, this guide will take you through the steps of building a budget-friendly photo studio that doesn’t compromise on quality.
Introduction
Contents
- Introduction
- Why Build a DIY Photo Studio?
- Essential Tools and Materials
- Choosing the Right Space
- DIY Backdrops on a Budget
- Lighting Solutions for Tight Budgets
- Tripods and Camera Stands on a Dime
- Budget-Friendly Options for Stable Shots
- DIY Camera Stands and Tripods
- Organization and Storage Hacks
- Editing Tools Without Breaking the Bank
- DIY Photography Props
- Tips for Maximizing Perplexity in DIY Photography
- Dealing with Burstiness in DIY Photography
- Real-Life DIY Success Stories
- Common Pitfalls to Avoid
- Conclusion
- FAQs
- Is it really possible to build a photo studio on a tight budget?
- Do I need expensive equipment for professional-looking photos?
- How can I optimize natural light in my DIY photo studio?
- Are DIY props necessary for photography, or can I do without them?
- What is burst mode, and how can I use it effectively in DIY photography?
In a world where visuals play a crucial role, having access to a photo studio can be a game-changer. Whether you’re an aspiring photographer, a content creator, or simply someone who loves capturing moments, having your own photo studio opens up a realm of possibilities. However, the idea of building one might seem daunting, especially if you’re on a tight budget. Fear not! This guide will walk you through the process of creating a DIY photo studio without burning a hole in your pocket.
Why Build a DIY Photo Studio?
Cost-Saving Benefits
The primary motivation behind opting for a DIY approach is the significant cost savings. Professional photo studios can be expensive to rent, and purchasing high-end equipment may not be feasible for everyone. By taking matters into your own hands, you not only save money but also gain a sense of accomplishment.
Customization and Personalization
Another compelling reason to embark on a DIY photo studio project is the ability to customize it according to your preferences. From the choice of backdrops to the arrangement of lighting, every aspect can be tailored to suit your unique style. This level of personalization is hard to achieve in a rented studio.
Essential Tools and Materials
Before diving into the DIY process, it’s crucial to gather the necessary tools and materials. Your camera equipment, including a reliable camera and lenses, takes center stage. Additionally, investing in basic lighting essentials and securing or crafting suitable backdrops should be on your checklist.
Choosing affordable alternatives without compromising quality is key. Opt for second-hand camera equipment, explore cost-effective lighting options, and consider creative alternatives for backdrops and props.
Choosing the Right Space
Your available space plays a pivotal role in the success of your DIY photo studio. While a spare room is ideal, don’t let limited space deter you. Clever utilization of corners, closets, or even outdoor areas can yield fantastic results. When choosing a space, factor in the availability of natural light, as this can significantly enhance your photos.
DIY Backdrops on a Budget
Creative Alternatives to Expensive Backdrops
Traditional backdrops can be pricey, but fear not—there are numerous creative alternatives that won’t drain your wallet. Consider using bedsheets, curtains, or even large pieces of colored paper as affordable backdrop options. Experiment with textures and patterns to add visual interest to your photos.
Crafting Your Own Backdrop
For the ultimate budget-friendly approach, try crafting your own backdrops. Canvas or plywood, painted or draped with fabric, can serve as versatile and reusable backdrop options. This not only saves money but also allows you to create custom backdrops tailored to your specific needs.

Lighting Solutions for Tight Budgets
Great lighting is the secret to captivating photos, and achieving it on a budget is more than possible.
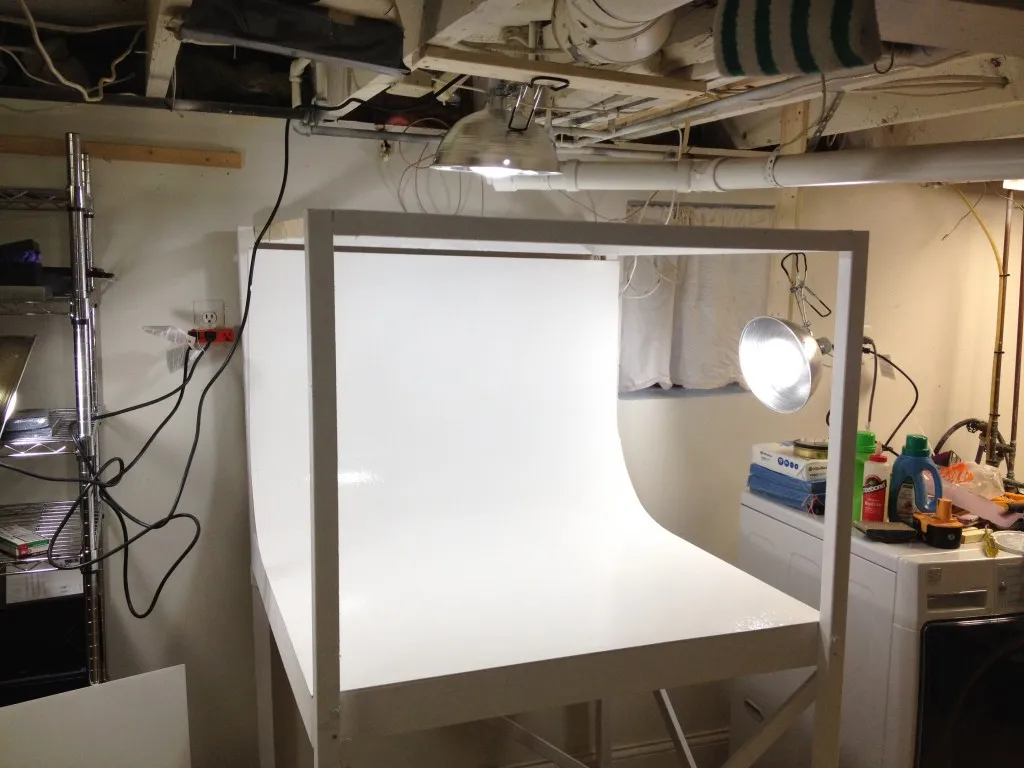
Affordable Lighting Options
Investing in professional lighting equipment can be expensive, but there are budget-friendly alternatives. Look for affordable softbox lights or explore DIY options using household items. Lamps with white sheets as diffusers can create soft, flattering light without breaking the bank.
Tips for Optimizing Natural Light
If your budget is particularly tight, make the most of natural light. Set up your photo studio near windows and experiment with the direction and intensity of sunlight. Utilizing sheer curtains or diffusers can help soften harsh sunlight, providing a natural and cost-free lighting solution.
Tripods and Camera Stands on a Dime
Stability is crucial for capturing sharp and focused images. Fortunately, budget-friendly options for tripods and camera stands abound.
Budget-Friendly Options for Stable Shots
Look for second-hand tripods or affordable alternatives available online. Many budget-friendly options offer stability and height adjustability, ensuring you can capture the perfect shot without compromising on quality.

DIY Camera Stands and Tripods
Feeling adventurous? Craft your own camera stands and tripods using household items. Sturdy books, PVC pipes, or even a stack of stable boxes can serve as makeshift stands, providing the stability needed for your photography endeavors.
Organization and Storage Hacks
Efficient organization of your equipment is essential, even in a DIY setup. Maximize your available space with creative storage solutions.
Efficient Storage of Equipment
Invest in storage containers and shelves to keep your equipment organized. Labeling containers and creating designated spaces for each item ensures easy access and prevents the chaos of searching for gear when inspiration strikes.
DIY Storage Solutions
Craft storage solutions using repurposed items. Old crates, cardboard boxes, or even pegboards can be transformed into functional and budget-friendly storage solutions for your photo studio.
Editing Tools Without Breaking the Bank
Capturing great photos is only half the battle—effective editing enhances the final result. Luckily, you don’t need to splurge on expensive software.
Free or Low-Cost Editing Software
Explore free or low-cost editing software options available online. Platforms like GIMP, Canva, or Lightroom offer robust editing capabilities without the hefty price tag. Mastering these tools will take your photos to the next level without draining your budget.
Enhancing Your Photos on a Budget
Learn the basics of photo editing to enhance colors, adjust lighting, and correct imperfections. There are countless online tutorials that can guide you through the process, making professional-looking edits achievable even for beginners.
DIY Photography Props
Elevate your photography by incorporating DIY props into your setups. Not only does this add creativity to your photos, but it also keeps costs low.
Crafting Props from Household Items
Look around your home for potential props. Books, plants, blankets, or even kitchen utensils can be repurposed as interesting and budget-friendly props. Let your creativity shine as you experiment with different elements to enhance your photos.
Enhancing Creativity Without Spending
DIY props not only save money but also add a personal touch to your photos. Get creative and experiment with different compositions, incorporating props to tell a unique story in each shot.

Tips for Maximizing Perplexity in DIY Photography
Perplexity adds depth and interest to your photos, making them more engaging and memorable.
Introducing Perplexity in Photo Composition
Experiment with angles, perspectives, and compositions to introduce perplexity into your photos. Play with depth of field, leading lines, and framing to create visually intriguing images. Don’t be afraid to step out of your comfort zone and try unconventional approaches.
Balancing Creativity and Simplicity
While perplexity is essential, striking a balance is equally crucial. Avoid overwhelming your photos with complexity. Aim for a harmonious blend of creativity and simplicity that captivates without losing the viewer’s focus.
Dealing with Burstiness in DIY Photography
Capturing dynamic shots on a budget requires strategic use of burst mode and quick reflexes.
Budget-Friendly Burst Mode Techniques
Many budget-friendly cameras come equipped with burst mode functionality. Experiment with burst mode to capture action shots, ensuring you don’t miss a moment. Practice timing and coordination to maximize the impact of burst shots.
Using Burst Mode Effectively
Burst mode is not just for action shots. Experiment with burst mode in still photography to capture subtle movements and expressions. This technique adds a burst of life to your photos, making them more dynamic and engaging.

Real-Life DIY Success Stories
To inspire your DIY journey, let’s explore real-life success stories of individuals who have built their own budget-friendly photo studios.
Showcasing Successful DIY Photo Studios
From small apartments to makeshift outdoor setups, these success stories highlight the creativity and resourcefulness of DIY enthusiasts. Gain insights from their experiences, learn from their challenges, and use their stories as motivation for your own DIY photo studio.
Learning from Others’ Experiences
Understanding the challenges others faced and the solutions they implemented can save you time and effort. Realize that building a DIY photo studio on a budget is a journey filled with learning opportunities, and each story adds valuable insights to your own adventure.
Common Pitfalls to Avoid
While embarking on your DIY photo studio project, it’s essential to be aware of common pitfalls to ensure a smooth experience.
Mistakes to Steer Clear of in DIY Photography
Learn from the mistakes of others to avoid common pitfalls in DIY photography. From overlooking lighting considerations to neglecting organization, understanding these pitfalls will help you navigate your DIY journey more effectively.
Tips for Troubleshooting Common Issues
Encounter a problem in your DIY setup? Consult these troubleshooting tips to overcome common issues. Whether it’s a lighting problem or an editing dilemma, having a handy guide at your disposal ensures you can address challenges quickly and continue creating stunning photos.

Conclusion
Building a DIY photo studio on a budget is a rewarding and empowering endeavor. From crafting your own backdrops to experimenting with burst mode, each step adds a layer of creativity to your photography. Embrace the challenges, learn from others, and enjoy the journey of creating a space where your unique vision comes to life.
Ready to embark on your DIY photo studio adventure? Get started today, and witness the transformation of your photography journey.
FAQs
Is it really possible to build a photo studio on a tight budget?
Absolutely! With creativity and resourcefulness, you can create a stunning DIY photo studio without breaking the bank.
Do I need expensive equipment for professional-looking photos?
Not at all. Many budget-friendly alternatives and DIY solutions can produce high-quality results.
How can I optimize natural light in my DIY photo studio?
Position your setup in windows, use sheer curtains or diffusers, and experiment with the direction of sunlight for optimal results.
Are DIY props necessary for photography, or can I do without them?
While not mandatory, DIY props add a personal touch and creativity to your photos, enhancing their visual appeal.
What is burst mode, and how can I use it effectively in DIY photography?
Burst mode captures multiple shots in quick succession. Experiment with it to capture dynamic action or subtle movements for more engaging photos.